
Every now and then, the need arises to bench test a Relay to find out if it's really bad or not.
This article will help you to bench test the Ford 20 amp multi-purpose Relay in a step by step fashion (there are two articles in site about bench testing a Ford Relay, the other is here: How To Bench Test A Ford Relay (Large Relay)).
Contents of this tutorial:
 You can find this tutorial in Spanish here: Cómo Probar En Banco Un Relé De Ford (Relé Pequeño) (at: autotecnico-online.com).
For your cross reference information:
- Ford part #:
- F57B-14B192-AA
- AutoZone part #:
- Duralast 19283
- Duralast 20749
- O'Reilly Auto Parts part #:
- IDI 25-0136
- Other part #:
- STANDARD MOTOR PRODUCTS RY612
What Tools Do I Need To Test The Relay?
You'll need two very important things to bench test the relay and they are:
- Multimeter
- The multimeter can be digital or analog multimeter.
- If you need to buy one or are looking to upgrade, check out my recommendations here: Buying A Digital Multimeter For Automotive Diagnostic Testing.
- Jumper Wires
- You'll need two of them with alligator clips on both ends (you can make these yourself).
Relay Basics
The core purpose of a relay is to control a high amount of current with a smaller (lower) current. And it does this by having one circuit mechanically open or close another circuit.
These two circuits can be classified as:
- A high current circuit.
- This is the circuit that is opened and closed.
- This is the circuit that delivers the current to the component that needs it.
- A low current circuit.
- This the circuit that activates or deactivates the relay by 'opening' or 'closing' the high current circuit.
The relay that this article will help you test is a non solid-state type, which means that it activates with mechanical components.
Here's a very brief look and explanation of what the relay is made up of and how it works.
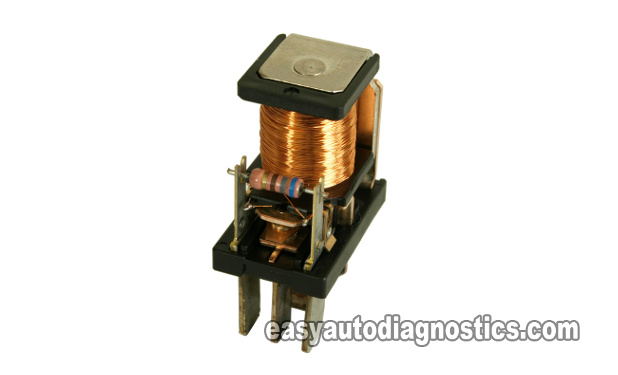
- Inside the relay's plastic cover, you'll find these core components:
- An Electromagnet
- This is a coil of wire wrapped around a soft iron core.
- When voltage flows thru it, it becomes a magnet.
- A movable Armature.
- This is the component that is moved from one contact to another, by the electromagnet's magnetic field, to complete the circuit (for the high current to pass thru').
- A Spring.
- After the relay is deactivated, the electromagnet's magnetic field collapses and the spring ensures the Armature returns to its original position.
- In this type of Relay, this spring is NOT the coil type. The spring is a leaf type spring.
- Several contacts.
- An Electromagnet
- When the relay's coil (electromagnet) gets energized (by having current flow thru' it), it moves the Armature to close against another contact.
- The Armature is the actual switch and completes or opens the circuit that will have the High current flowing thru' it.
- When the relay's coil gets de-energized, it loses it's magnetic power and thus let's go of the Armature.
- The Spring now acts on the Armature to place it back into its normally open position
- The High Current circuit now becomes ' open' , thus stopping any current from reaching the component that was being fed with it.
OK, working theory lesson is over, let's get testing in the next page.
Relay Bench Test
OK, it's time to get our hands dirty and bench test the relay.
You'll need a power source to activate the relay (during the test) and this power source will be your vehicle's Battery.
As mentioned in the previous page, you'll need three very important things:
- A Multimeter (analog or digital).
- Two jumper wires with alligator clips on the ends.
- Maybe a helper.
Alright, here are the test steps:
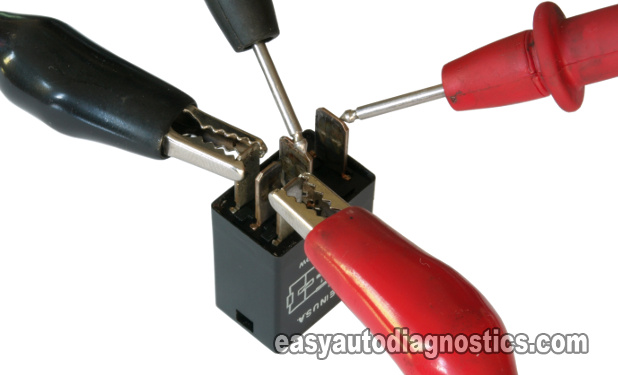
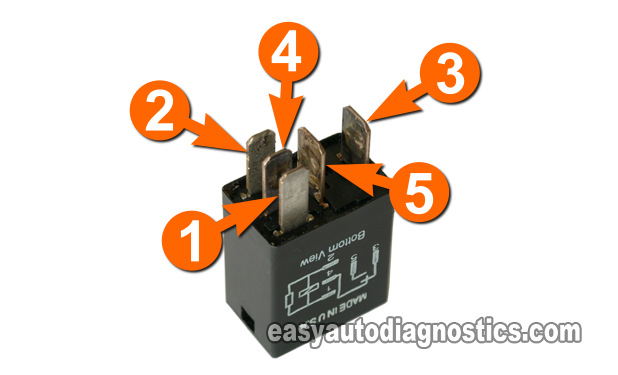
- Connect terminal 2 of the relay to the battery's Ground Terminal with a Jumper Wire.
- You can use the photo of the relay with all of the connections, since the photos show the actual test.
- If you don't have such a jumper wire (with alligator clips), you can run down to your local Radio Shack (even Walmart) and buy some alligator clips and make your own jumper wire.
- Connect male spade terminal 1 to the battery's positive (+) terminal. This will energize and activate the relay.
- It's normal to hear a small clicking from the relay when this connection is made.
- With your multimeter in Ohms mode, measure the resistance across the relay's terminals 3 and 5 with the multimeter leads (as seen in the photo).
- It doesn't matter which color lead goes where, since the polarity does not matter for this test.
- You may need a helper for this operation, unless your multimeter leads have alligator clips on the end of the leads.
- Your multimeter should show continuity. If it doesn't show continuity, recheck all your connections and retest.
- Remove and reconnect the jumper wire to terminal 1 several times, as you eye-ball the multimeter.
- When the jumper wire IS NOT connected to power, the multimeter should show NO CONTINUITY.
- When the jumper wire is connected to power, the multimeter should show continuity.
OK, let's take a look at what your test results mean:
CASE 1: Your multimeter showed continuity. This tells you that the relay is OK and not the cause of the problem.
CASE 2: Your Multimeter DID NOT show continuity. This tells you that the relay is bad and needs to be replaced.

If this info saved the day, buy me a beer!


