
Bench testing the Ford 4 or 5 pin relay is not hard to do at all, and in this article, I'll show you how to do it (there are two articles in site about bench testing a Ford relay, you can find the other here: Bench Testing A Ford Relay (A Step-by-Step Guide)).
These relays (like the one in the photo in the image viewer) are used in the majority of Ford vehicles.
Contents of this tutorial:
 You can find this tutorial in Spanish here: Cómo Probar En Banco Un Relé De Ford (Relé Grande) (at: autotecnico-online.com).
For your cross reference information:
- Ford part #:
- F0AB-14B192-AA.
- AutoZone part #:
- Duralast 19273.
- Santech MT0532.
- O'Reilly Auto Parts part #:
- BWD R3177.
- Other part #:
- STANDARD MOTOR PRODUCTS RY116.
This relay is used for the PCM, fuel pump, fan motors, and a bunch of other stuff.
What Tools Do I Need To Test The Relay?
You need a few basic things and they are:
- Multimeter.
- A digital or analog multimeter will work.
- If you need to buy one or are looking to upgrade, check out the one I use and recommend: Tekpower TP8268 AC/DC Auto/Manual Range Digital Multimeter (Amazon affiliate link).
- Jumper wires.
- You'll need two of them with alligator clips on both ends (you can make these yourself).
Relay Basics
This section isn't mandatory reading to test the relay, but I know a lot of folks dig some working theory (I do myself when researching anything on the Internet) and so this section is for you.
The core purpose of a relay is to control a high amount of current with a smaller (lower) current. How? You might ask.
Well, every relay has two basic circuits and for the purpose of our discussion, we'll call them:
- A high current circuit.
- A low current circuit.
Both of these are completely independent from one another, in other words, voltage/current flowing thru' these circuits don't mix.
The high current circuit is the one that delivers the voltage (and thus current) to the component that needs to activate. This component could be a cooling fan motor, an A/C compressor, a fuel pump, you get the idea.
The low current circuit is the control circuit that activates or deactivates the relay. By activating I specifically mean allowing voltage to pass thru' the relay (internally) and on its way to the component that needs to activate (fuel pump, cooling fan relay, A/C compressor, etc.).
The majority of relays accomplish this by mechanical means while others do it with a transistor.
The relay we're talking about in this article is the mechanical type and works in the following way:
- The relay has the following core components inside
- An electromagnet
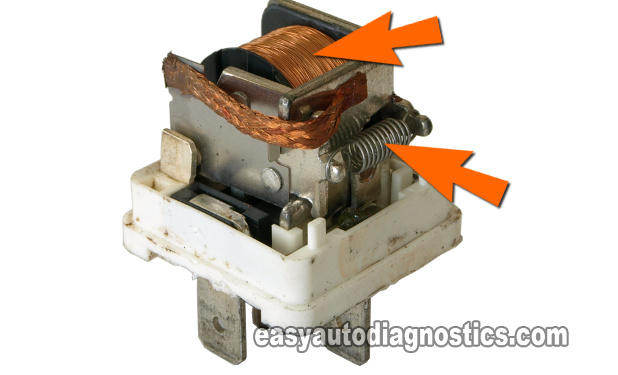
- This is a coil of wire wrapped around a soft iron core.
- When energized with voltage, it becomes a magnet.
- Photo 2 of 3 (in the image viewer) shows the electromagnet (top arrow points to it).
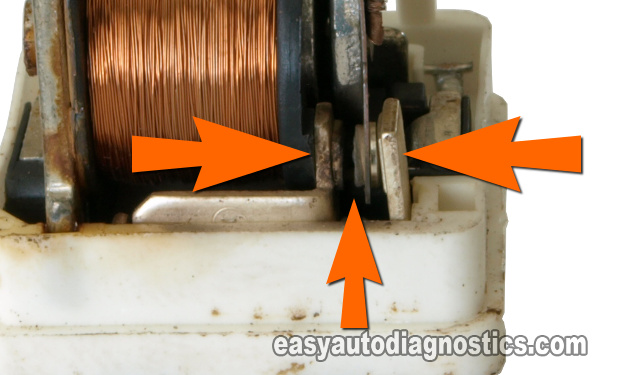
- A movable armature.
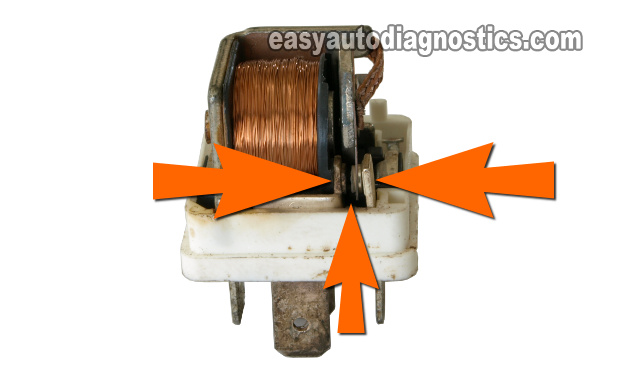
- This is the part that completes the high current circuit by uniting the circuit that has voltage to the circuit that will deliver it to the component (fuel pump, cooling fan relay, etc.) that needs the voltage/current.
- Photo 3 of 3 (in the image viewer) shows the armature (middle arrow) and two contacts.
- A spring.
- Photo 2 of 3 (in the image viewer) shows the spring (bottom arrow).
- Several contacts.
- An electromagnet
- When the electromagnet gets energized (by having current flow thru' it), it moves the armature to close against another set of contacts.
- The armature acts as a switch and completes the circuit that will have the high current flowing thru' it.
- When the electromagnet gets de-energized, it loses it's magnetic power and thus let's go of the armature.
- The spring now acts on the armature to place it back into its normally open position
- The high current circuit now becomes 'open' and the current that was flowing thru' it stops.
OK, working theory lesson is over, let's get testing in the next page.
Testing The Relay
Since your Ford vehicle uses quite a few of the exact same type of relay, you can swap them out and in this way test them. But if you're like me, sometimes you need a real test to make absolute sure that the relay is bad.
Well, you've come to the right place for such a test.
You'll need three very important things:
- A multimeter (analog or digital).
- Two jumper wires with alligator clips on the ends.
- Maybe a helper.
OK, to get this test going, this is what you'll need to do:
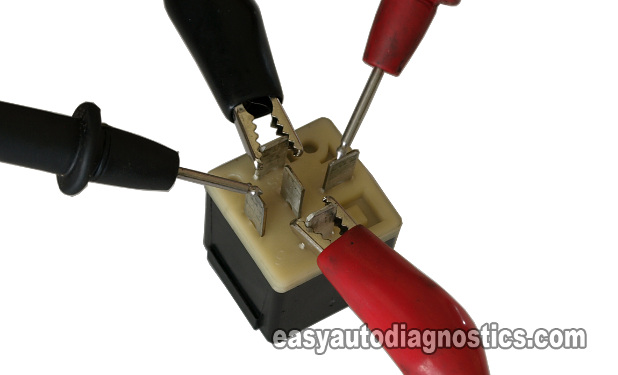
- Place the relay you need to test close to the vehicle's battery (you'll need battery power and Ground for this test).
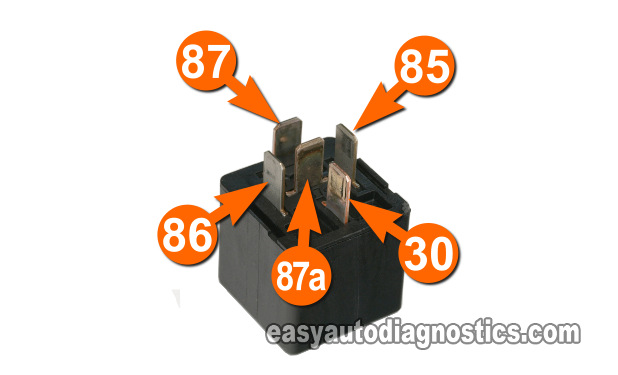
- Using a jumper wire with alligator clips, connect terminal 85 of the relay to the battery's Ground (-) terminal
- The photos in the image viewer are an exact representation of what goes where.
- If you don't have such a jumper wire (with alligator clips), you can run down to your local Radio Shack (even Walmart) and buy some and make your own jumper wire.
- Activate the relay by connecting male spade terminal 86 to the battery's positive (+) terminal.
- It's normal to hear a small clicking from the relay when this connection is made.
- With your multimeter in Ohms mode: touch terminals 30 and 87 with the multimeter leads (as seen in the photo).
- It doesn't matter which color lead goes where, since the polarity does not matter for this test.
- You may need a helper for this operation, unless your multimeter leads have alligator clips on the end of the leads.
- Once the last connection is made, your multimeter should show continuity. If it doesn't show continuity, recheck all your connections and retest.
- Remove and reconnect the jumper wire to terminal 86 several times, as you eye-ball the multimeter.
- When the jumper wire IS NOT connected to power, the multimeter should show NO CONTINUITY.
- When the jumper wire is connected to power, the multimeter should show continuity.
OK, let's interpret your test results:
CASE 1: Your multimeter showed continuity. This tells you that the relay is OK and not the cause of the problem.
CASE 2: Your multimeter DID NOT show continuity. This tells you that the relay is bad and needs to be replaced.

If this info saved the day, buy me a beer!


