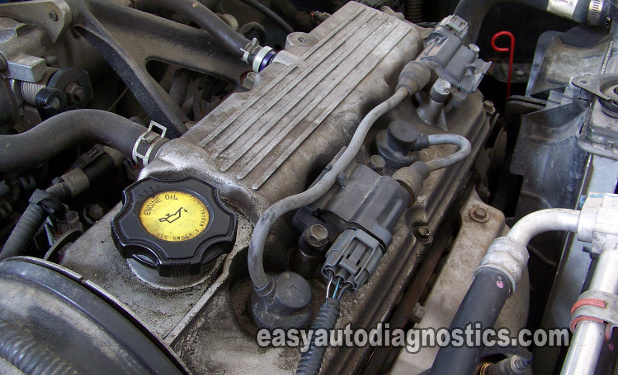
This is a step by step ‘how to test’ tutorial that will take you by the hand, so to speak, to diagnose and troubleshoot a misfire condition on your Suzuki or Chevrolet car or truck.
This article covers the Coil-On-Plug (C.O.P.) ignition coils on the 99 thru' 01 1.3L Suzuki Swift or 1.3L Chevy Metro or the 99 thru' 02 1.6L Suzuki Vitara or 1.6L Chevy Tracker.
Contents of this tutorial:
- Symptoms Of A Bad Coil-On-Plug Ignition Coil.
- What Tools Do I Need?
- Circuit Descriptions Of The C-O-P Ignition Coil Connector.
- Basic Operating Theory.
- Precautions, Do's And Don'ts.
- TEST 1: Spark Test.
- TEST 2: Testing The Power (12 V) Circuit.
- TEST 3: Testing The Ground Circuit.
- TEST 4: Triggering Signal Test.
- TEST 5: Testing For Spark At The Ignition Coil.
- TEST 6: Testing For Spark At The Ignition Coil.
- TEST 7: Misfire Due To Carbon Tracks.
- Related Articles.
Symptoms Of A Bad Coil-On-Plug Ignition Coil
When one or several ignition coils on your Suzuki Swift (or Vitara or Chevy Metro or Tracker) have gone bad, you'll know right away. Your vehicle will display one of the following symptoms:
- The car will run and idle rough.
- No power as you accelerate the car down the road.
- Really bad gas mileage.
- The vehicle will not start.
- The car will not run on all cylinders.
- Misfire codes that are lighting up the check engine light on your instrument cluster.
- P0300, P0301, P0302, P0303, P0304
- Rotten egg smell coming out of the tail-pipe.
What Tools Do I Need?
Testing the Coil-On-Plug (COP) ignition coils on your Suzuki Swift doesn't require any expensive testing equipment or expensive tools. Below is the list of tools that you'll need to successfully troubleshoot and diagnose a bad C.O.P ignition coil on your Swift:
- A 12 Volt automotive test light.
- A multimeter that can read Hz Frequency.
- An HEI spark tester
- This tool is a must have. To see what this tool looks like, click here: OTC 6589 Electronic Ignition Spark Tester (Amazon affiliate link).
- Battery jump start cables.
- Someone to help you crank the car.
Circuit Descriptions Of The C-O-P Ignition Coil Connector
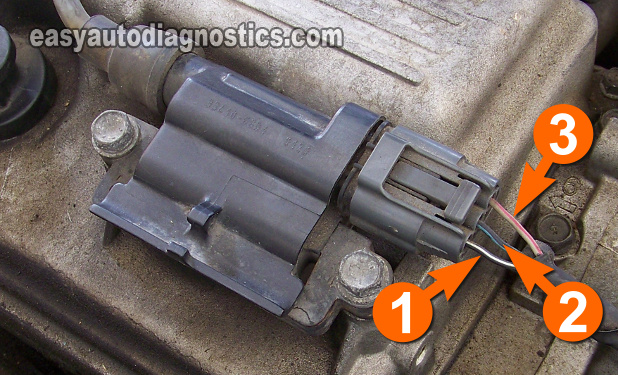
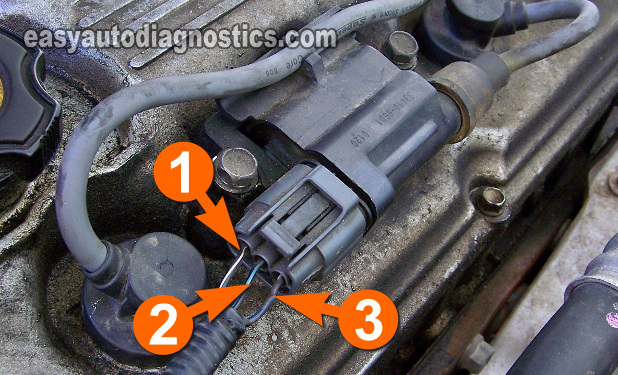
Each Coil-On-Plug (COP) ignition coil on your Suzuki Swift has three wires coming out of them. In the image viewer photos you'll find the wires labeled with the numbers 1 thru' 3. Below you find our what each circuit does:
- Circuit labeled 1:
- 12 Volts
- Circuit labeled 2:
- Ground
- Circuit labeled 3:
- Triggering Signal Circuit.
The color of the wires is not important (to take advantage of the info in this article) as long as you're able to correctly identify the circuit by its number in the photos supplied.
Basic Operating Theory
As you might already know, this type of ignition system the ‘ignition control module’ function is handled by a transistor inside of the Coil-On-Plug ignition coil (both ignition coils have this transistor). The PCM (Powertrain Control Module=Fuel Injection Computer) is the one that controls the whole show. So, in a nutshell, here's what happens when you turn the key to crank and start the car:
- The engine starts to crank, inducing the crankshaft position (CKP) sensor to start producing its CKP signal.
- The Crank signal, upon being received by the PCM along with other necessary sensor information, starts to do its little song and dance and sends back a Triggering signal to each ignition coil.
- This Triggering signal contains the instructions for the Transistor (within each ignition coil) to start firing the ignition coil it's a part of.
- Each Coil-On-Plug (COP) ignition coil then fires spark to two different cylinders at the exact same time (in what's known as the Waste Spark method).
- One cylinder is fed spark directly by the ignition coil.
- The other cylinder is fed spark thru' a spark plug wire (high tension wire).
OK, technically speaking, this type of ignition system is not a true Coil-On-Plug (C.O.P.) system, but hey, if it kinda’ looks like a duck and kinda’ quacks like a duck -who cares? You're here to test them, not hold a debate about what category of ignition system they fit into.
Precautions, Do's And Don'ts
Most of the testing that you'll be doing is with the engine cranking, so take all necessary safety precautions to keep your fingers, hands and entire self safe. Here are a few other tips and suggestions:
- Do not use a regular spark plug instead of a spark tester to test for spark.
- Do not remove the spark plug wire from the spark plug or the ignition coil while the engine is cranking to test for spark.
- Start your diagnostic from TEST 1, do not skip around from test to test unless instructed to do so by the TEST you're currently on.
- Do not use a test light where an LED light is called for.
- Once again, use the recommended/indicated tools for all of your tests.
TEST 1: Spark Test
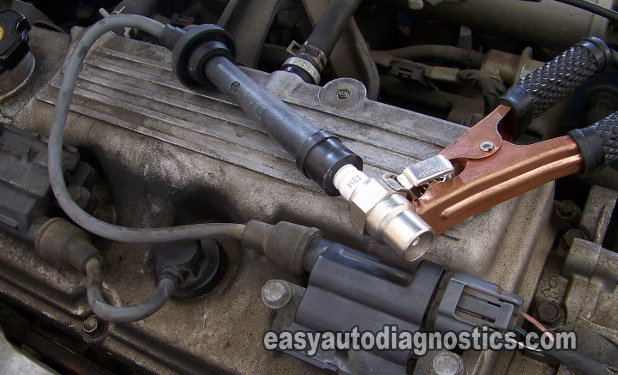
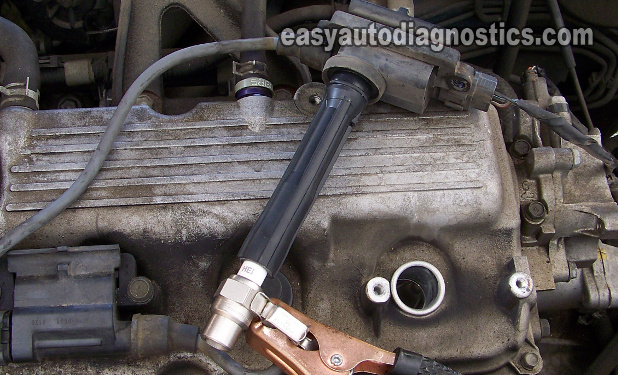
Whether you know which cylinder is the one that is misfiring or not, I recommend that you test all four cylinders for spark.
As mentioned before, the successful outcome of your troubleshooting/diagnostic lies in the usage of a spark tester.
The following test steps assume that you're gonna' start by testing from the #1 cylinder:
- 1
Remove the spark plug wire (high tension cable) from the spark plug and attach the spark tester to it.
- 2
Connect the spark tester to the battery negative (-) terminal with a battery jump start cable as shown in the photo.
- 3
Have your helper crank the vehicle while you observe the spark tester from a safe distance.
NOTE: The vehicle may or may start, either way be careful. - 4
You're gonna' get one of two results: Spark or no spark.
- 5
Now repeat this test on the other cylinders.
IMPORTANT: Since one Coil-On-Plug ignition coil fires two spark plugs simultaneously, the following result interpretations take into account if the no-spark results that you may have obtained are from the spark tester connected to a spark plug wire or connected directly to the ignition coil. Read all of the options carefully to see which fits your spark result(s):
CASE 1: You got spark from all cylinders. This is the correct test result and indicates that the ignition coils and spark plug wires are OK.
The cause of your misfire condition is not due to a bad ignition coil. If a misfire problem is still present, consult this section: TEST 7: Misfire Due To Carbon Tracks.
CASE 2: You got NO spark from a spark plug wire. Further testing is required to see if this is due to a bad spark plug wire (high tension wire) or if the C.O.P. Ignition coil it's attached to is bad.
Your next step is to go to: TEST 5: Testing For Spark At The Ignition Coil.
CASE 3: You got NO spark from an ignition coil's spark plug boot. This usually indicates that the C.O.P. Ignition coil is probably bad.
The good news is that we can make sure it's bad in TEST 6. Go to: TEST 6: Testing For Spark At The Ignition Coil.
CASE 4: You got NO spark from a spark plug wire and a spark plug boot on the same ignition coil. The next step is to verify that the ignition coil is getting power, Ground and the Triggering signal, go to TEST 2: Testing The Power (12 V) Circuit.
TEST 2: Testing The Power (12 V) Circuit
The Coil-On-Plug (C.O.P.) ignition coil needs 12 Volts to be able to function. The test can be accomplished by testing the C.O.P. Coil connected or disconnected to its connector.
The method I recommend to use is with them connected to its connector and with a wire-piercing probe (you can see an example of this tool and where to buy it here: Goupchn 4mm Banana to Banana Plug Test Leads Kit (Amazon affiliate link).
Now, if you decide to unplug the connector to test the front of the female terminal (of the connector) for 12 Volts, be careful not to damage it.
These are the test steps:
- 1
Re-install the ignition coil back onto its place on the valve cover.
- 2
Disconnect the ignition coil from its 3-wire connector.
- 3
Connect the black multimeter test lead to the battery negative (-) terminal.
- 4
Place your multimeter in Volts DC mode.
- 5
With the red multimeter test lead, gently probe the connector's terminal that connects to the wire labeled with the number 1.
- 6
Have your helper turn the key to the ON position.
- 7
You should see 10 to 12 Volts on your multimeter.
Let's take a look at what your test result means:
CASE 1: The multimeter registered 10 to 12 Volts (or the test light lit up). This is the correct test result and it tells you that the ignition coil is receiving power.
The next step is to make sure that the ignition coil is receiving Ground, go to: TEST 3: Testing The Ground Circuit.
CASE 2: The multimeter DID NOT register 10 to 12 Volts (or the test light DID NOT light up). This tells you that the ignition coil is not receiving power.
This result eliminates the COP ignition coil as the source of the misfire condition. Repairing the cause of this missing voltage will solve the no-spark problem of this ignition coil.
TEST 3: Testing The Ground Circuit
The COP ignition coil needs Ground to be able to function, so in this test section, we're gonna' check to see if it's receiving it.
The wire that supplies Ground to the ignition coil is the one labeled with the number 2 in the photo above.
We'll do a simple multimeter voltage test to test for the presence of Ground in the wire.
Let's get testing:
- 1
Put the multimeter in Volts DC mode.
- 2
Disconnect the ignition coil from its electrical connector (if it isn't already).
- 3
Connect the red multimeter test lead to the battery positive (+) terminal.
- 4
Have your helper turn the key to the ON position.
- 5
With the black multimeter test lead, gently probe the connector's terminal that connects to the wire labeled with the number 2.
- 6
You should see 10 to 12 Volts on your multimeter.
Let's take a look at what your test result means:
CASE 1: The multimeter registered 10 to 12 Volts. This is the correct test result and it lets you know that Ground is present in the wire.
The next step is to test for the presence of the ignition coil's Triggering signal, go to: TEST 4: Triggering Signal Test.
CASE 2: The multimeter DID NOT register 10 to 12 Volts. This confirms that the ignition coil is not receiving Ground. Without it, the ignition coil will not fire spark.
This result eliminates the COP ignition coil as the source of the misfire condition. Repairing the cause of this missing Ground will solve the no-spark problem of this ignition coil.