
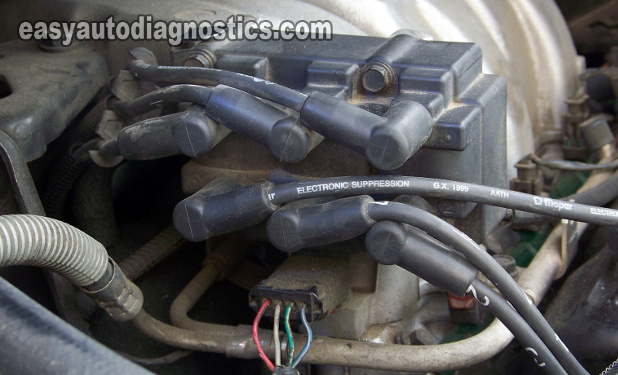
This tutorial is a step by step testing guide to diagnose and troubleshoot a misfire condition and/or a bad ignition coil pack on the 1999-2001 3.3L V6 equipped Chrysler (Dodge and Plymouth) mini-vans.
NOTE: There are two other ignition coil pack test tutorial:
- How To Test The Coil Pack (1990-1998 Chrysler 3.3L, 3.8L).
- How To Test The Coil Pack (2001-2008 Chrysler 3.3L, 3.8L).
Contents of this tutorial:
- Symptoms Of A Bad Chrysler Coil Pack.
- Where To Buy The Ignition Coil And Save.
- What Tools Do I Need?
- Coil Pack Circuit Descriptions.
- Basic Operating Theory.
- Precautions, Do's And Don'ts.
- TEST 1: Testing For Spark At The Spark Plug Wire.
- TEST 2: Testing For Spark At The Ignition Coil Pack.
- TEST 3: Testing For Spark At The Ignition Coil Pack.
- TEST 4: Testing The Power (12 Volts) Circuit.
- TEST 5: Switching Signal Test For Cylinders 1/4.
- TEST 6: Switching Signal Test For Cylinders 2/5.
- TEST 7: Switching Signal Test For Cylinders 3/6.
- TEST 8: Other Possible Misfire Causes.
 You can find this tutorial in Spanish here: Cómo Probar La Bobina De Encendido (1999-2001 3.3L Chrysler) (at: autotecnico-online.com).
Symptoms Of A Bad Chrysler Coil Pack
When the ignition coil pack or the spark plug wires are bad, your Chrysler (or Dodge or Eagle or Plymouth) mini-van will display one or more of the following symptoms:
- The car idles rough and wants to stall (die).
- When you accelerate the car, it has no power.
- Really bad gas mileage.
- The vehicle will not start.
- The car will not run on all cylinders.
- Misfire codes that are lighting up the check engine light on your instrument cluster.
- P0300, P0301, P0302, P0303, P0304, P0305, P0306.
- Rotten egg smell coming out of the tail-pipe.
Where To Buy The Ignition Coil And Save
The following links will help you comparison shop for the ignition coil pack:


Disclosure: As an Amazon Associate, I earn from qualifying purchases. Buying through these links helps support this site at no extra cost to you. Thanks for your support —it really means a lot!
Not sure if the above ignition coils fit your particular vehicle? Don't worry, once you get to the site they'll make sure it fits by asking you the specifics of your vehicle. If they don't fit, they'll find you the right ones.
What Tools Do I Need?
To successfully use this information to diagnose and troubleshoot your Chrysler (or Dodge or Eagle or Plymouth) mini-van, you need a few specific tools. Don't worry, none of this stuff is expensive, here's the list:
- A 12 Volt automotive test light.
- A multimeter (don't have a digital multimeter? Need to buy one? Click here to see my recommendations: Tekpower TP8268 AC/DC Auto/Manual Range Digital Multimeter (Amazon affiliate link)).
- A LED light.
- To see what this tool looks like, click here: The LED Light Test Tool And How To Make One.
- An HEI spark tester
- This tool is a must have (don't have an HEI spark tester? Need to buy one? You can buy it here: OTC 6589 Electronic Ignition Spark Tester (Amazon affiliate link)).
- Battery jump start cables.
- Someone to help you crank the car.
The HEI spark tester is a must have tool to be able to troubleshoot and diagnose a bad coil pack on your Chrysler (or Dodge or Eagle or Plymouth) mini-van. Using the wrong tool or method will have you chasing a wrong diagnostic test conclusion and effectively wasting your time and money.
Coil Pack Circuit Descriptions
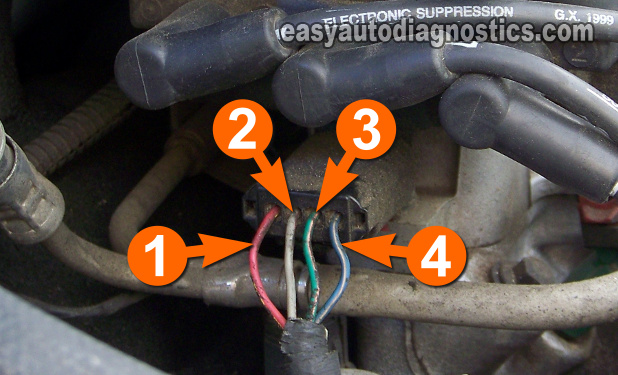
It's important to know what the four wires coming out of the Chrysler coil pack connector do and below you'll learn the circuit descriptions of each.
- Circuit labeled 1:
- Switching Signal Circuit for spark plugs 3 and 6.
- Circuit labeled 2:
- Switching Signal Circuit for spark plugs 1 and 4.
- Circuit labeled 3:
- Power (12 Volts) Circuit
- Circuit labeled 4:
- Switching Signal Circuit for spark plugs 2 and 5.
You've probably noticed that there's no mention of the color of the wires of the three wires coming out of the connector, well the color is not important (to take advantage of the info in this article) as long as you're able to correctly identify the circuit by its number in the photos supplied.
Basic Operating Theory
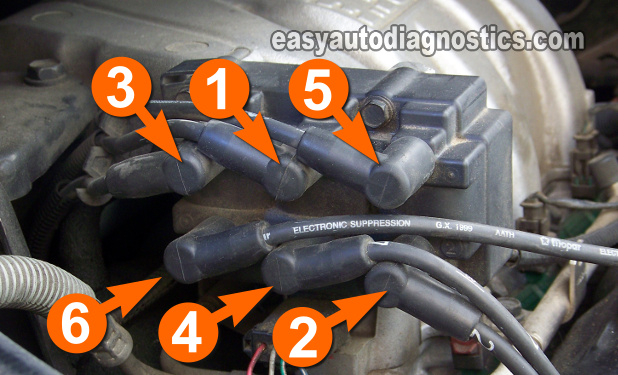
The PCM (Powertrain Control Module= Fuel Injection Computer) is the one that controls the whole show in this type of ignition system since the 'Ignition Control Module' function is handled by the PCM itself. So, in a nutshell, here's what happens when you turn the key to crank and start the car:
- The crankshaft position sensor starts to create its CKP signal, as the engine cranks.
- The CKP signal, upon being received by the PCM along with other necessary sensor information, starts to do its little song and dance and activates the Auto Shut Down (ASD) Relay and decides which ignition coil (within the coil pack assembly) to fire. It does this by sending the coil pack three different Switching signals (thru' separate circuits)
- The term Switching signal describes the PCM's action of switching the Primary Current (12 Volts), flowing thru' each ignition coil within the coil pack, ON and OFF by interrupting their Ground path. It's this signal that makes the ignition coils fire spark.
- The ASD Relay is the one that powers the coil pack and this only happens with the engine cranking or running. The ASD Relay will not power up the coil pack with just the key in the ON position (and engine OFF).
- The coil pack is made up of three separate and individual ignition coils, therefore each one gets its own switching signal from the PCM. Each ignition coil within the coil pack has two towers that feed spark to two cylinders at the same time.
- One ignition coil within the coil pack fires spark to cylinders 3 and 6.
- One ignition coil fires cylinders 1 and 4.
- The other ignition coil fires cylinders 2 and 5.
- As each individual ignition coil, within the ignition coil pack, get their Switching signal, they then fire spark to two different cylinders at the exact same time (in what's known as the Waste Spark method).
To test the Chrysler ignition coil (for these specific 3.3L Chrysler engines this article covers) the only thing that you have to worry about is knowing that two cylinders get spark at the exact same time (#3 and #6, #1 and #4, #2 and #5) from separate ignition coils within the coil pack assembly.
Precautions, Do's And Don'ts
The tests you're about to learn are pretty simple and easy but, since most of them are done with the engine cranking, you need to be alert and on your toes. Take all necessary safety precautions to keep your fingers, hands and entire self safe. Here are a few other tips and suggestions:
- All of the coil pack tests in this article are on-car tests. Do not remove the ignition coil pack from the vehicle.
- Do not use a regular spark plug instead of a spark tester to test for spark.
- Do not remove the spark plug wire from the spark plug or the ignition coil while the engine is cranking to test for spark.
- It's important that you start your diagnostic from TEST 1, do not skip around from test to test unless specifically instructed to do so by the TEST you're currently on.
- Do not use a 12 Volt test light where an LED light is called for.
- Once again, use the recommended/indicated tools for all of your tests.
TEST 1: Testing For Spark At The Spark Plug Wire
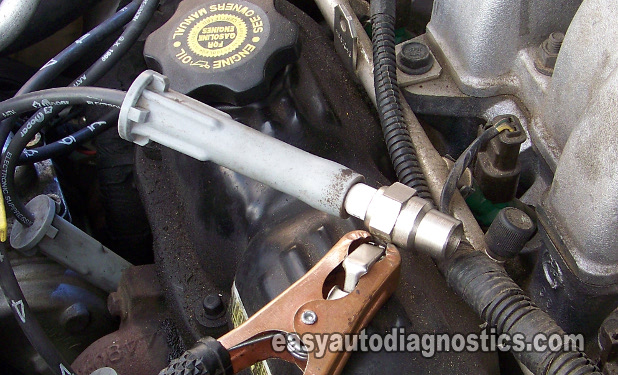
Whether you know which cylinder is the one misfiring, because you have retrieved specific misfire codes (like: P0301, P0302, P0303, P0304, P0305, P0306), or you don't know, this is where you need to start your diagnostic and/or troubleshooting.
The following test steps assume that you're gonna' test all cylinders for spark by starting with #1 cylinder.
Do you have to test them all? The answer is NO, you don't have to test them all (especially since the 3 spark plug wires that face the firewall are a complete pain in the neck to test).
You can test the cylinders you want or have misfire codes for. Remember, the successful outcome of your trouble-shooting/diagnostic lies in the usage of an HEI spark tester.
If you don't have an HEI spark tester and need to buy one, you can buy it here: OTC 6589 Electronic Ignition Spark Tester (Amazon affiliate link).
Let's get this show on the road:
- 1
Remove the spark plug wire (high tension cable) from the spark plug.
- 2
Attach the spark tester to the spark plug wire.
- 3
Connect the spark tester to the battery negative (-) terminal with a battery jump start cable as shown in the photo in the image viewer.
- 4
Have your helper crank the engine while observing the spark tester from a safe distance.
CAUTION: The vehicle may or may start, either way be careful. - 5
You're gonna' get one of two results:
1.) Spark.
2.) No spark. - 6
Repeat this test on the rest of the cylinders (if needed or applicable).
IMPORTANT: If you get a no-spark result from two or more cylinders, you're gonna' need to check if those spark plug wires connect to paired cylinders. Just to refresh your memory, paired cylinders would be:
- Cylinders #1 and #4.
- Cylinders #2 and #5.
- Cylinders #3 and #6.
Examples of unpaired cylinders would be: cylinders 1 and 3, or 2 and 4, or 1 and 2, etc.
Alright, let's interpret your test results:
CASE 1: You got spark from all 6 spark plug wires. This indicates that the ignition coils and spark plug wires are OK. The cause of your misfire condition is not due to a bad ignition coil.
Your next step is to go to: TEST 8: Other Possible Misfire Causes to see further tips and suggestions.
CASE 2: You got NO spark from only one spark plug wire. The next step is to check for spark directly on the coil pack tower that feeds that spark plug wire with spark. Go to: TEST 2: Testing For Spark At The Ignition Coil Pack.
CASE 3: You got NO spark from two spark plug wires that connect to paired cylinders 1 and 4 or paired cylinders 2 and 5 or cylinders 3 and 6. The next step is check for spark directly on the ignition coil towers (one at a time of course) that feed those spark plug wires.
For this test, go to: TEST 3: Testing For Spark At The Ignition Coil Pack.
CASE 4: You got NO spark from two spark plug wires that DO NOT connect to paired cylinders. The next step is to test each coil pack tower directly for spark one at a time. Go to: TEST 2: Testing For Spark At The Ignition Coil Pack.
CASE 5: You got NO spark from none of the spark plug wires. This usually indicates that power is missing from the power circuit or that the crankshaft position sensor is bad.
Your next step is to go to: TEST 4: Testing The Power (12 Volts) Circuit.