
TEST 2: Testing For Spark At The Ignition Coil Pack
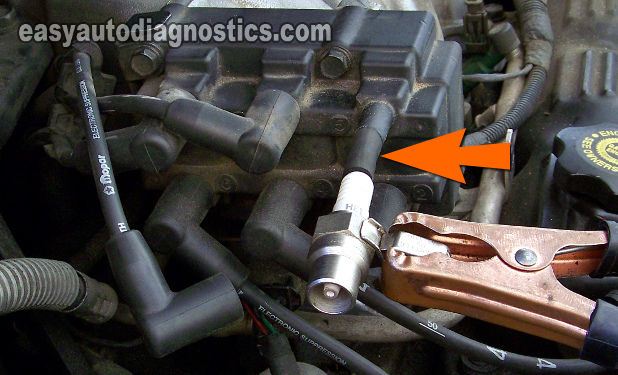
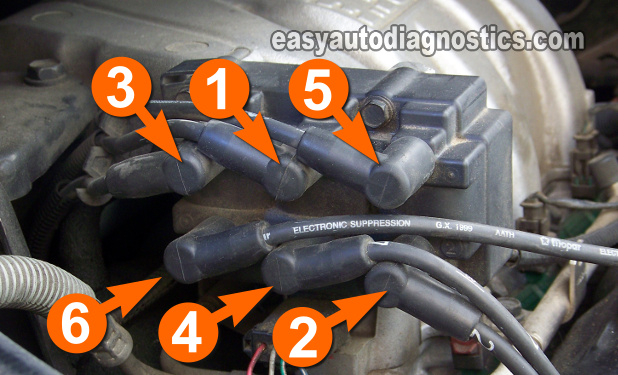
In this test step, you're gonna' test for spark directly on the ignition coil pack tower that connects to the spark plug wire that did not spark in TEST 1.
If you get spark, then you can conclude that the spark plug cable that did not spark (in TEST 1) is defective and all of the spark plug wires should be replaced as a set.
If you don't get spark, then the ignition coil pack is defective and needs to be replaced.
These are the test steps:
- 1
Remove the spark plug wire that did not fire off spark from the ignition coil pack.
- 2
Place the spark tester directly on the ignition coil tower using a small piece of vacuum hose.
IMPORTANT: It is crucial that you use this piece of vacuum hose! (see photos in the image viewer). - 3
Connect the spark tester to the battery negative (-) terminal with a jump start cable (see photo).
- 4
Have your helper crank the engine.
CAUTION: The engine may start, so be careful. - 5
You're gonna' get one of two results:
1.) Spark.
2.) No spark.
Let's see what your test results mean:
CASE 1: You got spark. This result lets you know that the ignition coil is good and that the spark plug wire is bad. Replace all of the spark plug wires as a set.
CASE 2: You got NO spark. This test result confirms that the ignition coil is bad.
Replacing the ignition coil will solve the misfire condition and the misfire code lighting up the check engine light (CEL) on the instrument cluster.
TEST 3: Testing For Spark At The Ignition Coil Pack
In this test step, your mission is to test for spark directly on the ignition coil pack towers that feed spark to the two spark plug wires (of paired cylinders) that did not fire off spark in TEST 1.
You'll test one tower first and then test the other. The correct test result is for both towers to spark.
If both towers don't spark, then you can conclude that the ignition coil is defective and needs to be replaced.
Let's get started:
- 1
Remove the spark plug wire that did not fire off spark from the ignition coil pack.
- 2
Place the spark tester directly on the ignition coil tower using a small piece of vacuum hose.
IMPORTANT: It is crucial that you use this piece of vacuum hose! (see photos in the image viewer). - 3
Connect the spark tester to the battery negative (-) terminal with a jump start cable (see photo).
- 4
Have your helper crank the engine.
CAUTION: The engine may start, so be careful. - 5
You're gonna' get one of two results:
1.) Spark.
2.) No spark. - 6
Disconnect the HEI spark tester from the ignition coil tower and reconnect its spark plug wire.
- 7
Repeat tests 1 thru' 6 on the other ignition coil tower whose spark plug wire did not fire off spark.
Let's see what your test results mean:
CASE 1: You got spark from only one tower. This result lets you know that the ignition coil is bad. Replace the ignition coil.
Here's why: Both ignition coil towers fire spark simultaneously to their 'paired' cylinders. Since only one of both towers is sparking, the ignition coil is bad and needs replacement.
CASE 2: You got spark from both towers. This result lets you know that the ignition coil is good and that the spark plug wires are bad. Replace all of the spark plug wires as a set.
CASE 3: You got NO spark from both towers. This usually means that the Switching signal for those two towers is missing.
The next step is to test for the Switching signal for that particular ignition coil (within the coil pack) that owns the two towers you just got done testing by choosing one of the following:
- If you got NO spark from the towers that feed spark to cylinders 1 and 4, go to: TEST 5: Switching Signal Test For Cylinders 1/4.
- If you got NO spark from the towers that feed spark to cylinders 2 and 5, go to: TEST 6: Switching Signal Test For Cylinders 2/5.
- If you got NO spark from the towers that feed spark to cylinders 3 and 6, go to: TEST 7: Switching Signal Test For Cylinders 3/6.
TEST 4: Testing The Power (12 Volts) Circuit
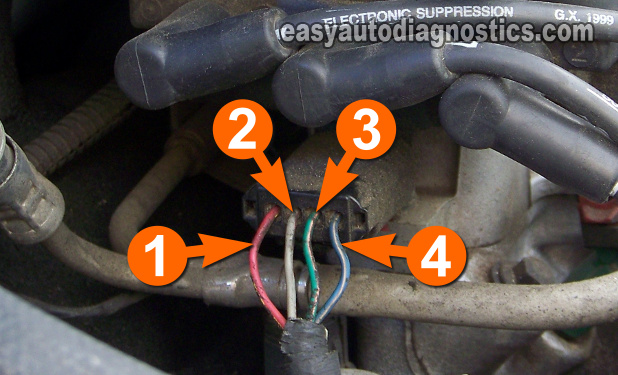
In this test section, we're gonna' make sure the ignition coil pack is getting power.
You can use a multimeter or a 12 Volt test light to test the power (12 Volt) circuit of the Chrysler coil pack.
To get an accurate test result, I recommend that you use a multimeter.
Alright, these are the test steps:
- 1
Disconnect the ignition coil from its electrical connector.
- 2
Put the multimeter in Volts DC mode.
Don't have a digital multimeter and need to buy one, see my recommendation here: Tekpower TP8268 AC/DC Auto/Manual Range Digital Multimeter (Amazon affiliate link). - 3
Probe the wire labeled with the number 3 with the red multimeter test lead (using an appropriate tool to pierce the wire).
NOTE: The 4 wires in the ignition coil pack's connector are usually sheathed in black electrical tape that has probably turned plastic hard, remove enough of this electrical tape to expose the three wires for testing - 4
Connect the black multimeter test lead to the battery negative (-) terminal.
- 5
Have your helper turn the key to the ON position and then crank the engine.
NOTE: Continuous voltage is only provided when the engine is being cranked. - 6
You should see 10-12 Volts on your multimeter. If you're using a 12 Volt test light, it should light up.
Let's see what your test results mean:
CASE 1: The multimeter registered 10 to 12 Volts DC. This is the correct test result. Then the next step is verify that the Switching signals are present.
Your next step is to go to TEST 5: Switching Signal Test For Cylinders 1/4, then TEST 7: Switching Signal Test For Cylinders 3/6.
If the all three Switching signals are not present (after testing them in TEST 5, TEST 6, and TEST 7), the most likely cause will be that there's an open-circuit problem in the engine wiring harness or a bad connector somewhere in the engine harness.
CASE 2: The multimeter DID NOT register 10 to 12 Volts DC. Re-check all of your connections and retest.
If still no voltage is present, this result exonerates the coil pack. Repairing the cause of this missing voltage will solve the 'no-spark no-start' condition of your Chrysler (or Dodge or Plymouth) mini-van. The most common reasons for no power are:
- The crankshaft position (CKP) sensor is bad. If the CKP sensor is bad, the PCM will not power up the Auto Shut Down (ASD) Relay, which in turn will not power up the ignition coil pack or any other ignition system or fuel system component. You can find the CKP sensor test here:
- How To Test The Crank Sensor -No Spark No Start Tests (Chrysler 3.0L, 3.3L, 3.8L) (at troubleshootmyvehicle.com).
- A bad Auto Shut Down (ASD) Relay.
- A blown fuse.
TEST 5: Switching Signal Test For Cylinders 1/4
The 1/4 Switching signal is the signal that activates the ignition coil to fire off spark to cylinders 1 and 4.
Testing for the Switching signal, of the ignition coil (within the coil pack) that feeds cylinders 1 and 4, is a very simple and straightforward process.
You'll need to use an LED light and the ignition coil pack has to be connected to its connector.
You can see an example of the LED light here: Oznium Flush Mount 12V LED Light (Amazon affiliate link).
NOTE: This test is done with the ignition coil pack connected to its electrical connector.
These are the test steps:
- 1
With an appropriate tool, connect the black lead of the LED light to the wire identified with the number 2 in the image above.
This is the circuit that feeds the Switching signal to the ignition coil (within the coil pack) that feeds spark to cylinders 1 and 4 simultaneously. - 2
Connect the red lead of the LED light to the battery positive (+) terminal.
- 3
Have your helper crank the engine.
NOTE: The engine may start so be careful.
If the engine starts, have your helper turn it off. - 4
The LED light should flash ON and OFF the whole time the engine is cranking and during the time it was running.
Let's see what your test results mean:
CASE 1: The LED light flashed ON and OFF the whole time the engine was cranking or running. This is the correct test result and tells you that the PCM is providing the Switching signal and the circuit is OK.
This result confirms that the ignition coil pack is bad and needs replacement if you have:
- Confirmed that the spark plug wires for cylinders 1 and 4 are not sparking (TEST 1).
- Confirmed that the ignition coil towers for cylinders 1 and 4 are not sparking (TEST 3).
- In this test section, you've confirmed that the ignition coil pack is receiving the activation signal for cylinders 1 and 4.
CASE 2: The LED light DID NOT flash ON and OFF the whole time the engine was cranking or running. This test result tells you that the Switching signal is not present.
The most likely cause of this missing signal is either an open-circuit problem in the circuit between the connector and the PCM or the PCM is fried (altho' a fried PCM is rare).
This result eliminates the coil pack itself as the source of the misfire condition or no-spark condition.
CASE 2: The LED light DID NOT flash ON and OFF the whole time the engine was cranking or running. This test result tells you that the activation signal is not present.
The most likely cause of this missing signal is either an open-circuit problem in the circuit between the connector and the PCM or the PCM is fried (altho' a fried PCM is rare).
This result eliminates the coil pack itself as the source of the misfire condition or no-spark condition.