
TEST 4: EGR Pintle Position Sensor 5 Volt Reference Circuit
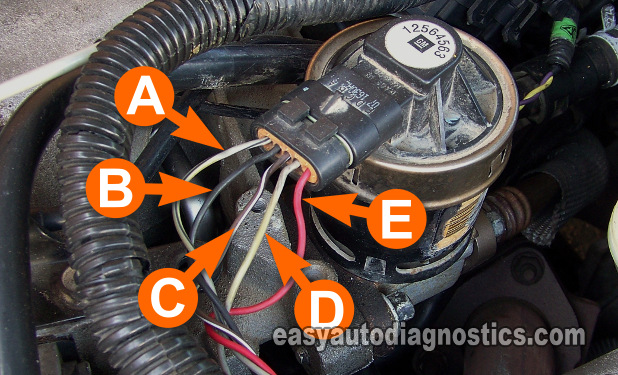
So far, your TEST 2 result indicates that the EGR valve registered 0 Volts (or close to) when you tested the wire labeled with the letter C.
This test section will help you find out if this is because the EGR valve's pintle position sensor is not getting 5 Volts or if the EGR valve is bad.
The EGR valve receives 5 Volts DC on the wire labeled with the letter D.
This is what you'll need to do:
- 1
Place your multimeter's selector in Volts DC mode.
- 2
Disconnect the EGR from it's electrical connector.
- 3
Probe the wire labeled with the letter D with the red multimeter test lead.
- 4
Connect the black multimeter test lead to the negative (-) battery terminal.
- 5
Turn the key ON (but engine OFF)
- 6
The multimeter should read between 4.5 and 5 Volts DC.
Let's see what your multimeter test results mean:
CASE 1: Your multimeter displayed 4.5 to 5 Volts DC. This is the correct test result and it lets you know that the EGR valve's pintle position sensor is getting the necessary voltage.
The next step, before condemning the EGR valve as bad, is to make sure that these 5 Volts have a good Ground path. For this test, go to: TEST 5: EGR Pintle Position Sensor Ground Circuit.
CASE 2: Your multimeter DID NOT display 4.5 to 5 Volts DC. This result exonerates the EGR valve itself as bad since without these 5 Volts the EGR valve will not function correctly.
Although it's beyond the scope of this article to troubleshoot why this voltage is missing, you now know where your diagnostic needs to focus on.
TEST 5: EGR Pintle Position Sensor Ground Circuit
You've reached this point because:
- In TEST 1, you verified that the EGR valve's passages in the intake plenum are not clogged.
- In TEST 2, you got a very low to 0 voltage reading on the wire labeled with the letter C (this is the EGR pintle position signal circuit).
- In TEST 4, your multimeter did register the 5 Volt Reference voltage that powers the pintle position sensor.
The next step is to check that the PCM is providing a good Ground for those 5 Volts.
If the PCM does not provide a Ground path, the EGR valve will not function and this test will help you to confirm this.
This is what you'll need to do:
- 1
Place your multimeter's selector in Volts DC mode.
- 2
Disconnect the EGR from it's electrical connector.
- 3
Probe the wire labeled with the letter B with the black multimeter test lead.
- 4
Connect the red multimeter test lead to the battery positive (+) terminal.
- 5
Turn the key ON (but engine OFF).
- 6
The multimeter should read between 10 to 12 Volts DC.
Let's take a look at what your test results mean:
CASE 1: Your multimeter displayed 10 to 12 Volts DC. This is the correct test result and it confirms that the EGR valve's pintle position sensor is receiving Ground.
You can conclude that the EGR valve is bad (and needs replacement) if you have confirmed that:
- The EGR valve's exhaust passage (in the intake manifold plenum) is not blocked (TEST 1).
- The EGR valve is not producing the correct pintle position value (TEST 2).
- The EGR valve's pintle position sensor is getting 5 Volts (TEST 4).
- The EGR valve's pintle position sensor is getting Ground (in this test section).
Here's why: The EGR valve's pintle position sensor is receiving power and Ground. With these two inputs, it has to produce a pintle position sensor signal to the PCM. Since it isn't, you can conclude that it's faulty.
CASE 2: Your multimeter DID NOT display 10 to 12 Volts DC. This result exonerates the EGR valve itself as bad since without a Ground path for the EGR pintle position sensor, the EGR valve will not function correctly.
Although it's beyond the scope of this article to troubleshoot why this Ground is missing, you now know where your diagnostic needs to focus on.
TEST 6: Testing The EGR Pintle Solenoid
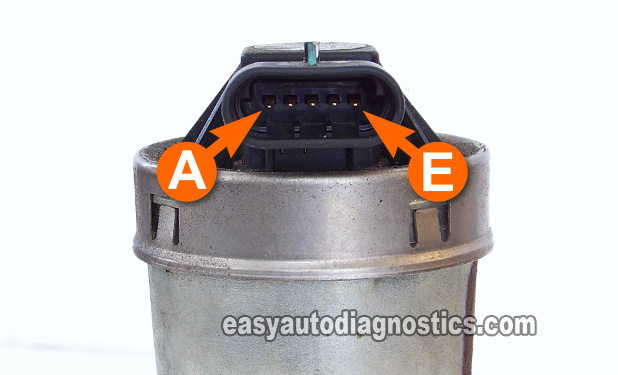
If you've reached this test, it's because you have already:
- Done TEST 1, and confirmed that the EGR passages in the intake manifold are carbon free.
- Done TEST 2, and confirmed that the EGR pintle signal voltage with the key ON engine OFF was normal.
- Done TEST 3, and road tested your vehicle (with the multimeter hooked up to the EGR valve) and the EGR pintle position voltage did not increase.
In this test, you'll test the EGR solenoid to see if its fried. If the EGR solenoid is fried, then the EGR pintle will not open (to let exhaust gas back into the engine) and this will be the reason why TEST 3 was failed.
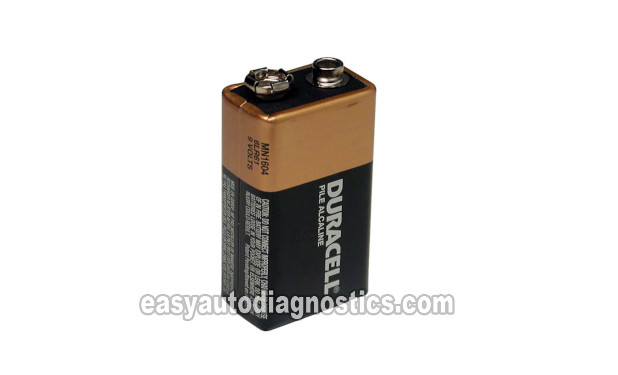
This test involves removing the EGR valve from the car and bench testing it by applying 9 Volts with a new 9 Volt battery to two specific EGR pins.
In case you're tempted: Do not apply 12 Volts and Ground from your car's battery.
This is what you'll need to do:
- 1
Remove the EGR valve from your vehicle.
CAUTION: The EGR valve may be hot, so be careful.
If the EGR valve is hot, you'll need to let it cool down before you proceed with the next steps (as a safety precaution). - 2
Connect one end of the jumper wire to the terminal labeled with the letter E.
Connect the other end of the same jumper wire to the positive (+) terminal of the 9 Volt battery. - 3
With another jumper wire: Connect one end of the jumper wire to the terminal labeled with the letter A.
Connect the other end of the same jumper wire to the negative (-) terminal of the 9 Volt battery. - 4
The EGR valve's solenoid should open the pintle once 9 Volts are applied to terminals A and E.
- 5
Blow air thru one of the EGR valve's orifices.
- 6
Air should easily pass from the inlet opening to the outlet opening that connects to the intake manifold.
Let's interpret your test result:
CASE 1: You were able to blow air from the inlet opening to the outlet opening. This result confirms that the EGR solenoid is OK.
Since the EGR solenoid is working, this confirms that the EGR pintle position sensor is bad and not reporting the change to the PCM. Replacing the EGR valve should solve this problem.
CASE 2: You were NOT able to blow air from the inlet opening to the outlet opening. This result confirms that the EGR solenoid is bad and that this is the reason the EGR valve failed TEST 3.
Replace the EGR valve.
TEST 7: Intake Manifold Blocked With Carbon
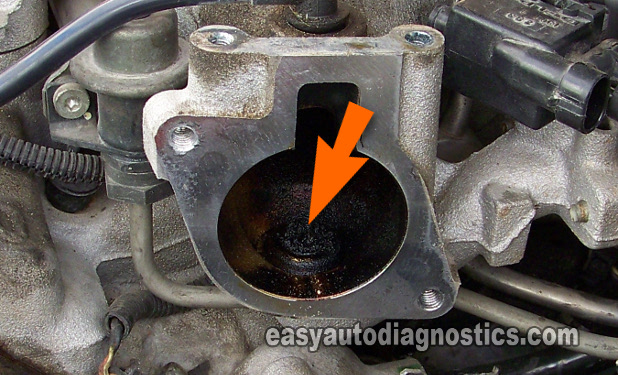
In this section, I want to share with you what the intake manifold will look like when it gets clogged.
I'll also offer you some suggestions on how to clean it. I do have to tell you that I won't be offering any specific/detailed remove and replace info (you'll need to look into a repair manual or google it).
OK, depending on the type of vehicle you're driving and the amount of space you have available, you can clean the intake manifold's plenum's EGR passages without removing the plenum from the engine (all you need to do is remove the throttle body and the EGR valve).
Some of the vehicles covered by this article require that the plenum be removed, no ifs and or buts.
The ideal (even if you don't need to remove the plenum) is to remove the plenum from the car, so that the carbon pieces you'll be removing don't fall into the combustion chambers.
If you do remove the plenum, here are my suggestions:
- Once the plenum is removed, place clean rags on all six intake ports
- This will prevent any foreign object (like a bolt or nut) from falling into the combustion chambers.
- If something falls into the open ports and into the cylinder, the only way to remove it is by removing the cylinder head. This is a nightmare you don't want to experience.
- Use a piece of coat hanger (as a type of snake) attached to an electric drill to clean out the EGR passages in the plenum.
- This method along with plenty of carburetor cleaner spray will effectively remove the carbon.
- Once you're done:
- Use a new intake manifold plenum gasket and install it without sealant (like RTV Silicone).
- Use a new throttle body gasket and install this bad boy without any type of sealant too.
- Installing these gaskets with any type of sealant may cause them to leak vacuum down the road.
Identifying The EGR Valve
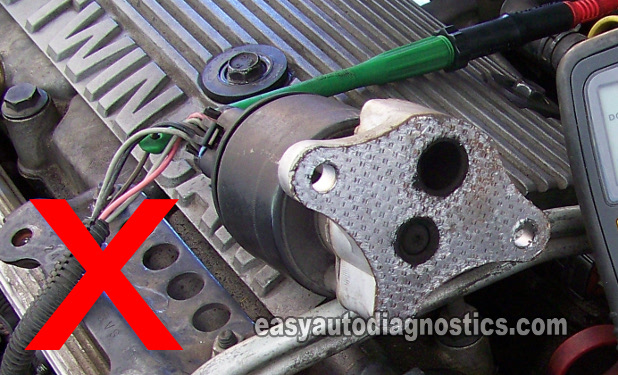
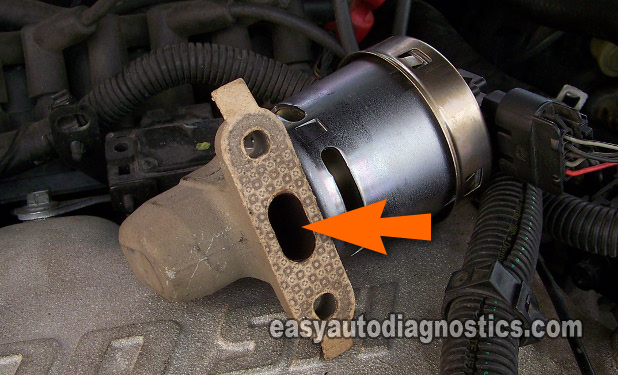
To make sure this linear EGR valve test tutorial applies to your specific vehicle, the base of the EGR valve on your specific vehicle should look like the one in photo 2 of 2 (in the image viewer above).
If the EGR valve on your vehicle looks like the one in the photo with the red X (and your vehicle is a 1999 or older model year and a 2.2L, 2.4L, 3.1L, 3.4L, 3.8L, 4.3L, 5.0L, 5.7L etc.), then your vehicle comes equipped with the older style EGR valve. You'll need to use this tutorial to diagnose it: How To Test The GM EGR Valve -Buick, Chevy, Olds, Pontiac.
Where To Buy The EGR Valve And Save
The following links will help you comparison shop for the EGR valve and the throttle body gasket:



Disclosure: As an Amazon Associate, I earn from qualifying purchases. Buying through these links helps support this site at no extra cost to you. Thanks for your support —it really means a lot!
Not sure if the above EGR valve or throttle body gasket fits your particular GM vehicle? Don't worry, once you get to the site they'll make sure it fits. If it doesn't, they find you the right part.
More GM 3.1L, 3.4L V6 Tutorials
If this tutorial was helpful, there's plenty more, and you can find them in the following new indexes:
- GM 3.1L Index of Articles (Chevrolet and Pontiac).
- GM 3.4L Index of Articles (Chevrolet and Pontiac).
- GM 3.1L, 3.4L Index of Articles (old section).
New 3.1L and 3.4L V6 Buick and Oldsmobile diagnostic tutorials can be found here:
- GM 3.1L Index of Articles (Buick and Oldsmobile) (at: troubleshootmyvehicle.com).
- GM 3.4L Index of Articles (Buick and Oldsmobile) (at: troubleshootmyvehicle.com).
- GM 3.1L, 3.4L Index of Articles (old section) (at: troubleshootmyvehicle.com).

If this info saved the day, buy me a beer!


